What is a DHCP-Server
DHCP stands for Dynamic Host Configuration Protocol (RFC2131 – IPv4, RFC 8415 –IPv6).
A DHCP-Server provides automatically IP-addresses and network-related configuration to other computers, servers and client devices in the network which are using TCP/IP.
What is KEA
KEA is a modern and modular DHCP-server for IPv4 and IPv6. It’s open-source and uses the JSON/REST API. It’s possible to build a cluster with several KEA servers, so you can failover with a MySQL database in the background. Another big thing is the possibility of dynamic reconfiguration. On most systems, you have to restart the service to take effect of your changes. That is not the case with KEA, you can make your changes while the process is running and they will take effect without restarting the service.
What is Stork
Stork is a graphical management dashboard for KEA. It is running on a central server with several agents on the different KEA systems. You can monitor the different KEA instances, view the configurations and system-health status of your KEA hosts.
Install KEA
For this tutorial, I use the minimal Image of the latest Debian11 release. Before we can install KEA we have to add some additional packages.
apt update && apt upgrade -yapt install git curl libboost-all-dev/stable openssl/stable git g++ libssl-dev liblog4cplus-dev/stable liblog4cplus-2.0.5/stable make cmake -yThe packages will automatically install, this can take some time depending on your system and internet connection.
Now we can download the latest KEA release from the GitHub project.
Notice in our tutorial that we are using the dev-version of KEA. It’s not recommended for production use. You can download the stable release from the git project as well.
git clone https://gitlab.isc.org/isc-projects/kea.gitNow we can change our working directory to the downloaded kea folder.
cd kea/The code from the git-source does not deliver the configuration file or the make file so we have to create them by ourselves.
autoreconf --installAfter this we generate the make files. Just run:
./configureYou can print the different options for the installation with:
./configure –-helpor look them up in the official documentation. The options are depending on your needs, for this tutorial we just use the default settings.
This looks good, so we can move on to re-compile our KEA daemon. We can do this by running the make command.
make This process can take some minutes. You can take a long coffee break with a clear conscience. 🙂
After this is finished you can install the KEA daemon with the command
make installTo finsih the installtion process we have to link the relevant libaries to the libary cache. – Change the working directory:
cd /usr/local/libYou must run the following command as root.
ldconfigStart KEA and Configuration-Files
The basic installation of KEA is finished. Before we start the service there are some things to explain.
KEA shipes default configuration files, you can find them at the following path.
/usr/local/etc/keaAs an example here is the top of he IPv4-Conf:
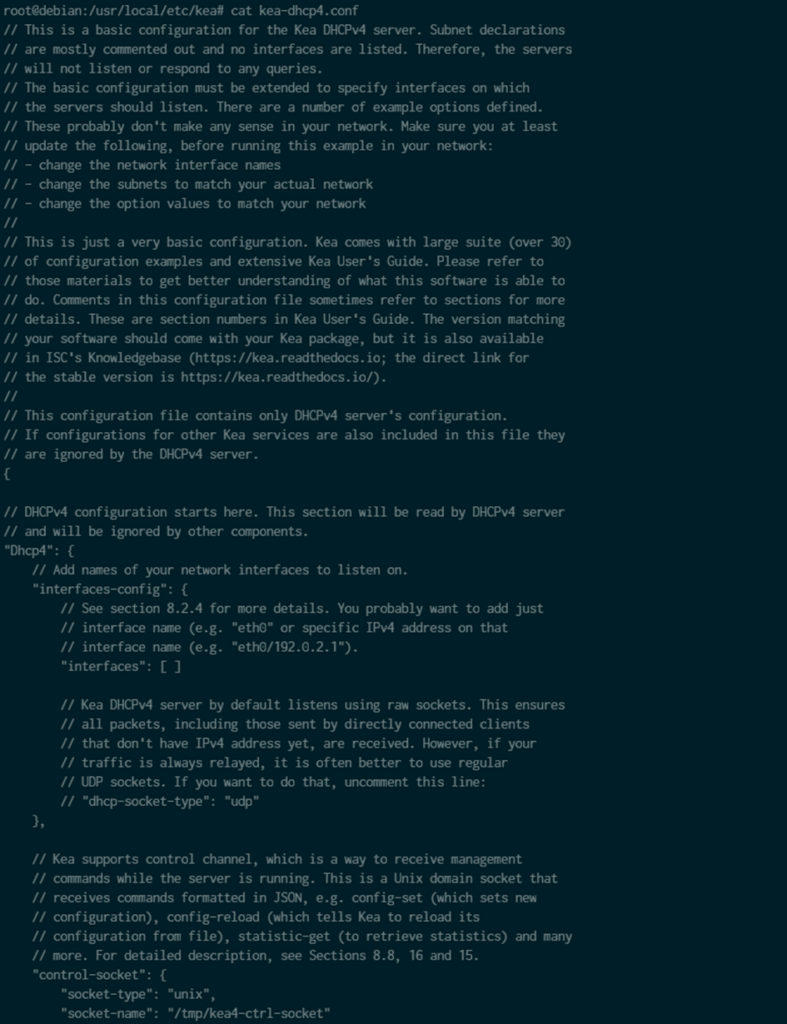
You can start KEA with that as it is. It’s not gonna do anything. It’s not gonna specify which interfaces that server should listen on, and there are subnets or options set.
There are some things that are configured but they are commented out, you can uncomment them to assemble your config.
Start KEA
You can start KEA directly with the following command and the path to your configuration file.
/usr/local/sbin/kea-dhcp4 -c /usr/local/etc/kea/kea-dhcp4.conf
You can do this even with IPv6 but in our example, we just start with the IPv4 configuration.
KEActrl
You can startup and shutdown KEA with special configuration files and reconfigure KEA. One of the big things with KEA is that you can make changes to your configuration and not have to restart the service.
KEActrl comes with a default configuration file as well.
For example you can start KEA with KEActrl and check the status
keactrl startkeactrl statusAnother helpful thing is that KEActrl shows you which configuration file is it pointed to.

Install Stork
Now we gonna switch to our other VM/server to install Stork as a dashboard for our KEA instance. In our example, our VM also runs a Debian 11. For the stork server, we need curl and a PostgreSQL database. As minimal a version of 10 or greater is recommended.
apt update && apt upgrade -y && apt install curlapt install postgresql-13/stable -yThis takes just a moment after the installation we are ready to prepare the database. First switch to the Postgres user:
su postgres
Then connect to the PostgreSQL with the administrator user:
psql postgres
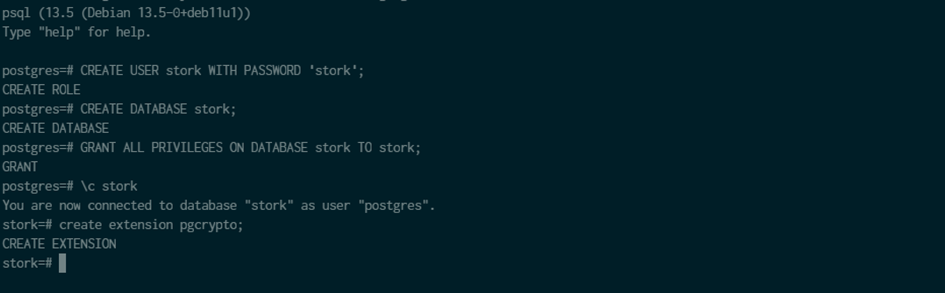
Now we will create the database for the stork server and the specific user:
CREATE USER stork WITH PASSWORD 'YOURPASSWORD';
CREATE DATABASE stork;
GRANT ALL PRIVILEGES ON DATABASE stork TO stork;
\c stork
create extension pgcrypto;
If you have done everything right, it should look like this:
Now we can leave PostgreSQL and switch back to the root user. You can do this just by using exit.
First we need to update our repositorys:
curl -1sLf 'https://dl.cloudsmith.io/public/isc/stork/cfg/setup/bash.deb.sh' | bash
If you are not working as root you have to run the command as followed:
curl -1sLf 'https://dl.cloudsmith.io/public/isc/stork/cfg/setup/bash.deb.sh' | sudo bashNow we can install the stork server:
apt install isc-stork-serverTo run the stork server we have to edit the default configuration file. You can find it here:
/etc/stork/server.envNow we edit the configuration file with credentials that we setup earlier. For this tutorial, I installed it all with the default settings. You can change this up for your case.
### database settings
### the address of a PostgreSQL database
STORK_DATABASE_HOST=localhost
### the port of a PostgreSQL database
STORK_DATABASE_PORT=5432
### the name of a database
STORK_DATABASE_NAME=stork
### the username for connecting to the database
STORK_DATABASE_USER_NAME=stork
### the SSL mode for connecting to the database
### possible values: disable, require, verify-ca or verify-full
# STORK_DATABASE_SSLMODE=
### the location of the SSL certificate used by the server to connect to the database
# STORK_DATABASE_SSLCERT=
### the location of the SSL key used by the server to connect to the database
# STORK_DATABASE_SSLKEY=
### the location of the root certificate file used to verify the database server's certificate
# STORK_DATABASE_SSLROOTCERT=
### the password for the username connecting to the database
### empty password is set to avoid prompting a user for database password
STORK_DATABASE_PASSWORD=stork
Start Stork
Congratulations! Everything is finished we can now enable the stork server and start it.
systemctl enable isc-stork-server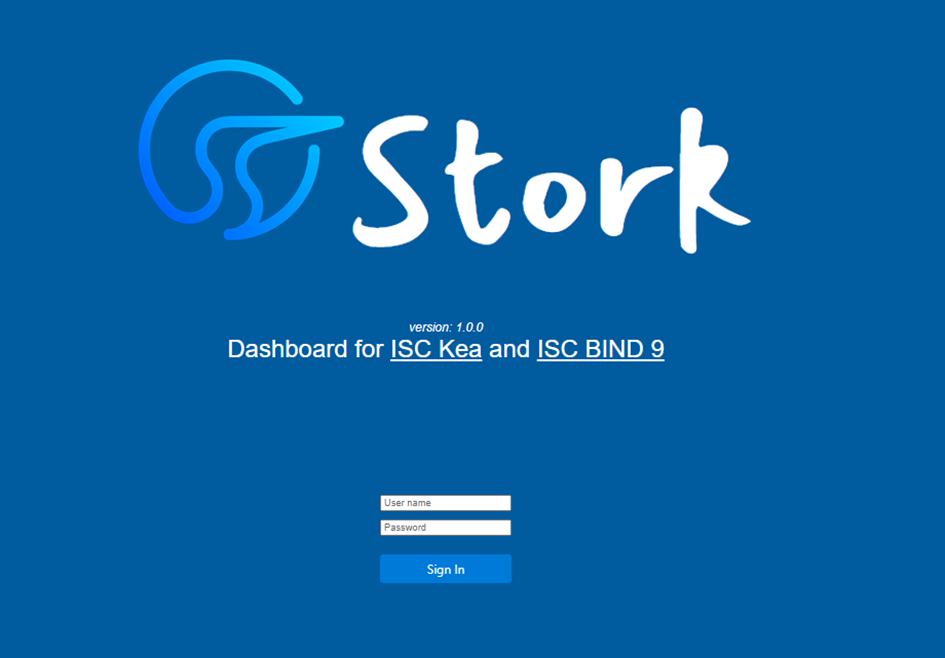
systemctl start isc-stork-serverBy default the stork server in listening on port 8080. Now you can access the dashboard by your web browser using this port:
http://IP-ADRESS-OF-YOUR-VM:8080Welcome to Stork
And here it is. You can access with the default credentials admin:admin
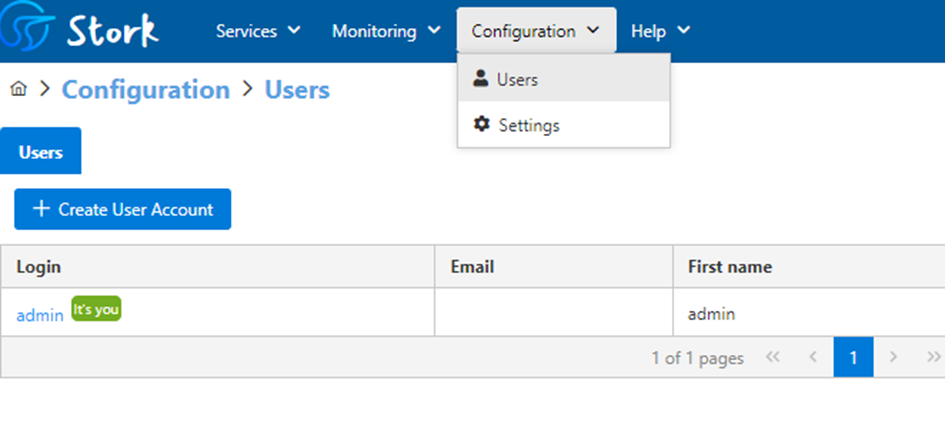
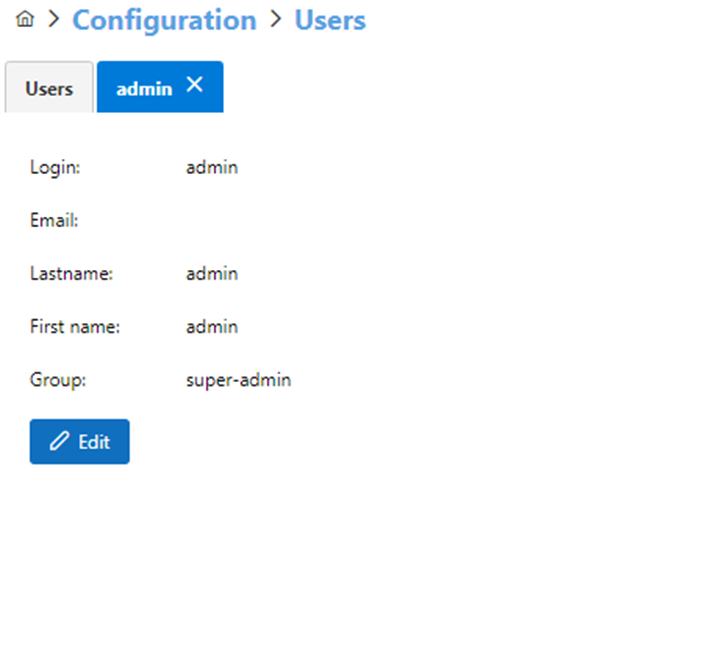
First you should change the admin password. For this go to Configuration → Users.
Click on the user and then you can edit the profile:
After this, we change back to the overview of the machine. Go to Services → machines:
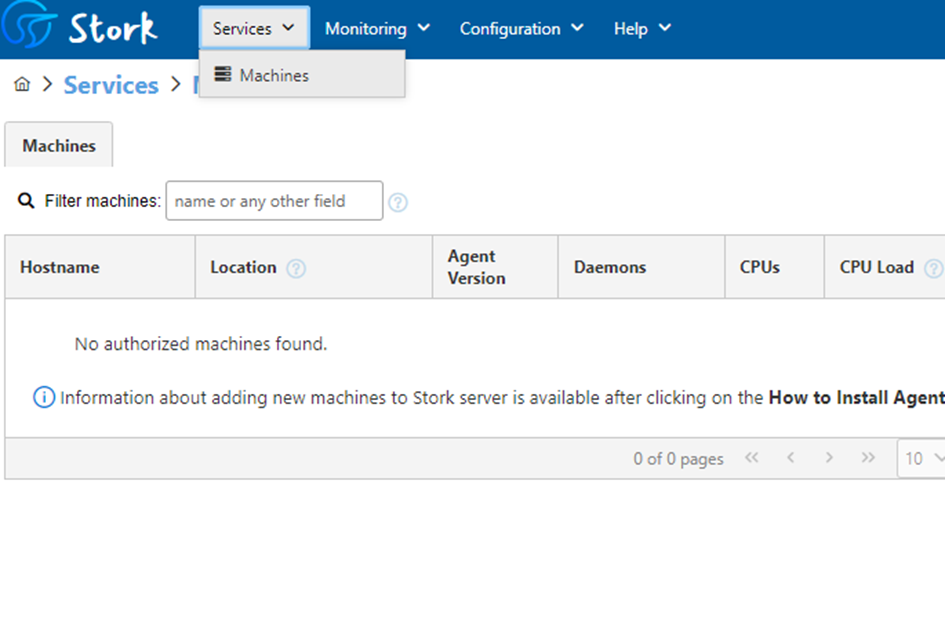
Currently, we have no active stork agents to check. So let’s go and change this.
Install Stork-Agent and register the agent
So that we can monitor our systems with KEA we need to install the stork agent on every instance which runs KEA. We can do this easily by clicking in the dashboard at the „How to Install Agent on New Machine“ button. A window will pop up with the commands that you have to run on the system with KEA. In my case, it looks like this:
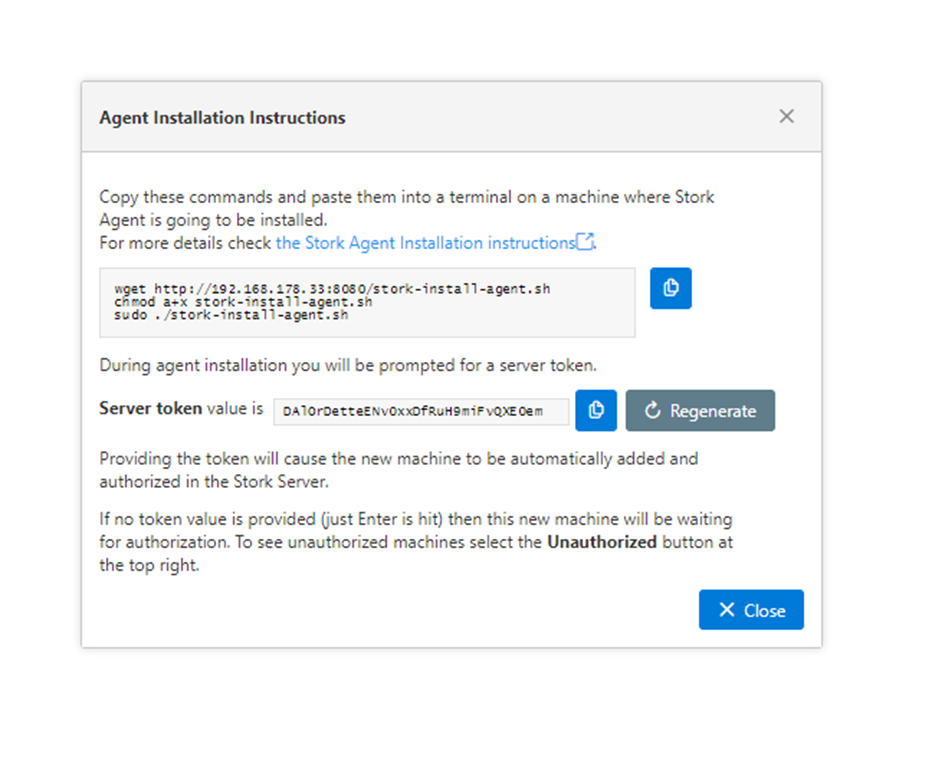
This will pull the installer from our stork server. Just use the commands from the window. While the installation, the installer will ask for the server token, just paste it. It will not shown on the CLI.
Then enter the IP address of the host that runs KEA and the port or leave it free for the default port.

If anything went fine it should look like this:
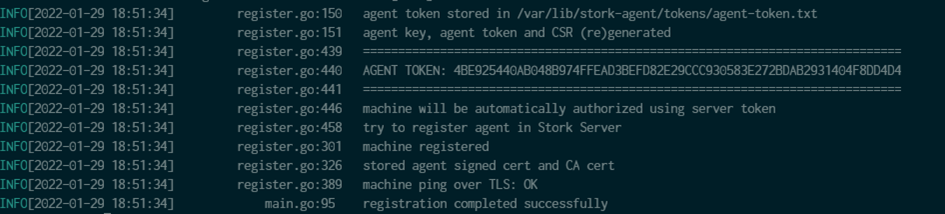
When we take a look at the stork dashboard we can see that our system is successfully added.

If you have a problem with the token, you can authorize your system at the index tab unauthorized.
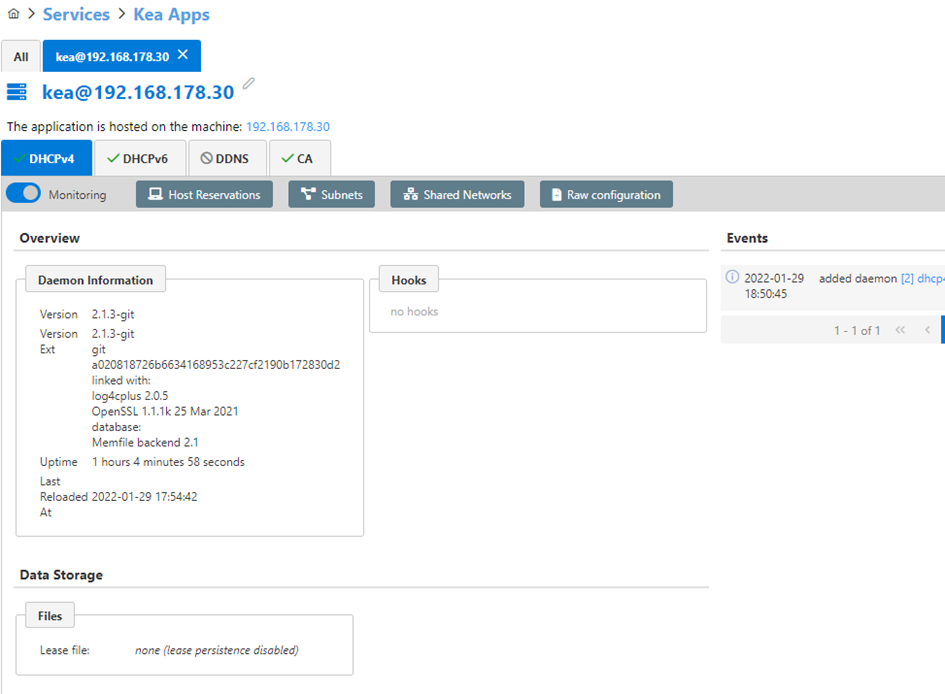
When we click on our machine we will get some information about the system itself, the health-state. Now we can change in the index tab on the top to Services → Kea Apps. Here we can get more information about the configuration of the KEA dhcp server.
That should be it for the first one, we will covert the advanced configuration in another tutorial.
Summary
KEA is a powerful open-source DHCP server that is constantly being developed. Stork adds a graphical interface that makes the monitoring of the different instances and setting much clearer. For business use it is worth taking a look here.
🖤 Did this article help you?
Buy me a coffee and support my work to keep this space 🚀 and ad-free. If you can’t, share my work to reach this 📖 out to more people.
running exactly this instruction, but the stork-install-agent.sh was never trasfered on my server so wget will run into an error
There is no single wget command in the hole introduction, you install stork from the repository.
I think Toni means stork-install-agent.sh script on the agent server. I had the same issue, installed stork server and got the installation instructions from stork dashboard. But when I ran the wget command for the install script, it returned an error. I checked to see if I could browse to the link but could not. There was no „stork-install-agent.sh“ file on stork server to download it.
When installing the agent to the KEA server I get the following error message:
Connecting to XXXXX:8080…. connected.
HTTP request sent, awaiting response… 500 Internal Server Error
2022-12-08 07:52:19 ERROR 500: Internal Server Error.
Hi there…. I think what Toni’s saying is about the ‚wget‘ on Agent Installation Instructions area… I’ve the same issue.
I installed Stork following all your steps with no problems and it’s running, but:
# wget http://10.10.2.100:8080/stork-install-agent.sh
–2022-12-09 03:37:24– http://10.10.2100:8080/stork-install-agent.sh
Connecting to 10.10.2.100:8080… connected.
HTTP request sent, awaiting response… 500 Internal Server Error
2022-12-09 03:37:24 ERROR 500: Internal Server Error.
I’ll check what happens and I’ll let you know.
Toni, here’s the solution: https://stork.readthedocs.io/en/v1.8.0/install.html#installation-from-cloudsmith-and-registration-with-a-server-token
Regards,
Rodrigo
hehe noob
Hi,when I write „wget … agent.sh“ I get an error: „HHTP request sent, awaiting response… 500 Internal Server Error. ERROR 500: Internal Sever Error.“ I used Ubuntu Server 22.04.
Do you know how to fix it?
When installing the agent to the KEA server I get the following error message:
Connecting to XXX.XX.X.XXX:8080…. connected.
HTTP request sent, awaiting response… 500 Internal Server Error
2022-12-XX 07:52:19 ERROR 500: Internal Server Error.
@Toni
It is because the stork-install-agent.sh script doesn’t exist or get created. So wget has nothing to get for you. Not sure if this is a bug or bad config.
I am having this same problem. The stork-install-agent.sh script doesn’t exist. Not sure where to go from here.
I really, really appreciate this, but almost everything failed. Not a single package would install with the /stable part at the end. When I tried to install all of the libraries in the second command without the /stable designation, it still failed with dependency issues. The „autoreconf“ didn’t work either, and I didn’t have „autoconf“ installed by default, so I had to add it first.
Since that didn’t work, I went somewhere else to find kea install commands, and those worked. However, when I came back here to install stork, I received an error in the psql command. When I tried to run the larger command, it failed with:
ERROR: syntax error at or near „cd“
LINE 1: cd /roo
Maybe 11.11 was not a good version to install? Should I pick something earlier? Does this need to be 11.0? Thanks for creating this, but it didn’t work for me!
Hello Roger,
the article is about a few years old.
Sadly I have no time to update this, cause my work focus shifted.
If I’ll find any time in the future I try to reproduce your errors and update the article.
Danke für die Anleitung musste einige Dinge abändern aber perfekt Danke.
Habe nun Probleme mit Stork Subnetze anzulegen. Er sagt was mit hooks libary usw.
Gibts da auch ein Tut dafür. ?
Beste Grüße Joe